


I had the very talented Danny Kersic come out and shoot me during an engagement session. I can't tell you how much I love doing what I do :) Soooo many wonderful things going on in my life right now. TODAY, I am a fulltime photographer ! I am launching into this biz full steam ahead !!!!!!! I have so many ideas and so many opportunities :) GOD is soooo good ! I get married in 24 days :) LIFE IS GOOD !!! I just had to share !!!! Thank you , to my sweet dearest friends ...MY PIXEL CHICKS .... for staying with me and supporting me on my journey !!!! THESE WOMEN ARE THE BEST OF THE BEST !!! I know of atleast 2 of them that will photograph my wedding WOO HOO ! YEY, for the good life :)
Wednesday, May 26, 2010
Monday, May 17, 2010
Creative Process Feature
Hi ~ Sherry here...
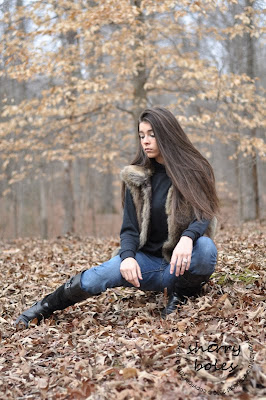
Fall is one of my favorite times to shoot because of all the gorgeous warm colors! Here's an image from winter where I was able to find some of the fall color lingering.
One of the best things about personal images is having the time to get a little more creative and try different things to see what fits your style. With this image, I just let my mind wander until I came up with something that I liked. I actually could have stopped at several times during the process and had an image that would have been acceptable to me but I wanted to push the image (and myself) a little further.


The steps behind the process:
1. A basic S-curve to add some depth
2. Pioneer Woman's warmth action to increase the warm tones
3. Darkened the background using the burn tool on a very low opacity
4. Duplicated the layer and changed blending mode to soft light (decreased opacity as desired)
5. Softened the image slightly to give it a more subtle look with very light use of blur
6. Texture added ~ An image of that I had taken of concrete was added as a new layer (the blending mode was changed to overlay). If you've never used textures, find the method that works for you...This is just one of the methods that I use.
Remember: Erase the texture from the areas that you do not want covered, such as the face!
7. Slight desaturation ~ Since I wanted a more subtle look with the texture, I desaturated the image slightly.
8. Cloned distraction ~ The texture overlay added an area that appeared like a smudge. I simply cloned to remove the undesired portion.
Fall is one of my favorite times to shoot because of all the gorgeous warm colors! Here's an image from winter where I was able to find some of the fall color lingering.
One of the best things about personal images is having the time to get a little more creative and try different things to see what fits your style. With this image, I just let my mind wander until I came up with something that I liked. I actually could have stopped at several times during the process and had an image that would have been acceptable to me but I wanted to push the image (and myself) a little further.
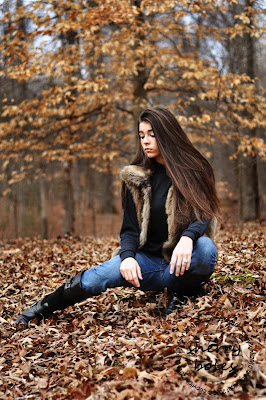
Original

basic S-curve ~added warmth

darkened background ~ soft light layer

slight gaussian blur

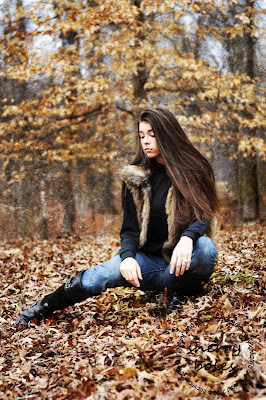
texture

slight desaturation ~ clone

The steps behind the process:
1. A basic S-curve to add some depth
2. Pioneer Woman's warmth action to increase the warm tones
3. Darkened the background using the burn tool on a very low opacity
4. Duplicated the layer and changed blending mode to soft light (decreased opacity as desired)
5. Softened the image slightly to give it a more subtle look with very light use of blur
6. Texture added ~ An image of that I had taken of concrete was added as a new layer (the blending mode was changed to overlay). If you've never used textures, find the method that works for you...This is just one of the methods that I use.
Remember: Erase the texture from the areas that you do not want covered, such as the face!
7. Slight desaturation ~ Since I wanted a more subtle look with the texture, I desaturated the image slightly.
8. Cloned distraction ~ The texture overlay added an area that appeared like a smudge. I simply cloned to remove the undesired portion.
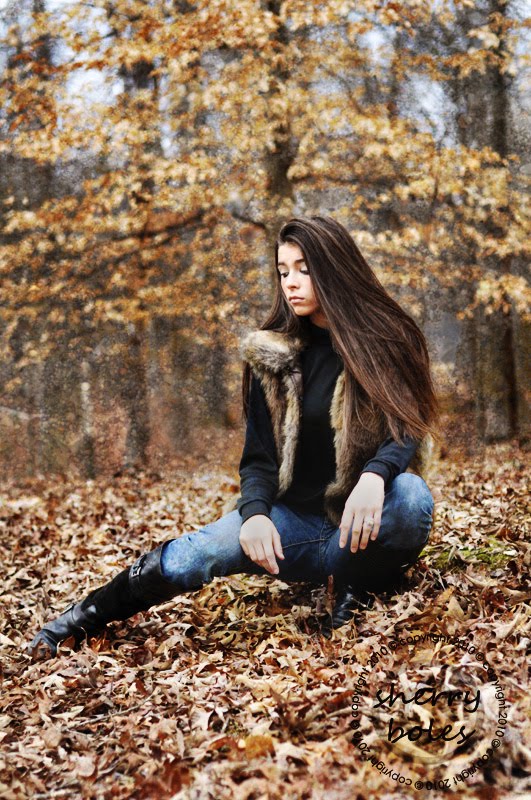
So there you have it...a little look at the wheels which turned in my head during the processing of this image. Having a perfectionist streak, I can always find some way to improve on images (and this one is no exception) but I like it when they make me smile! :)
Keep shooting!
Keep creative!
Keep having fun behind the camera...and in your processing!!
~sb
Keep creative!
Keep having fun behind the camera...and in your processing!!
~sb
Wednesday, May 12, 2010
We have a winner! SEO Guide Giveaway!
Sorry we got a little off schedule here due to some technical difficulties. But we're back and ready to announce the winner of Shannon Steffens fabulous SEO Guide!!!
Drum roll please.... and the winner is HALEIGH ROHNER!!!! In her winning comment Haleigh said: "Great feature! I've been wanting your guide forever! Pick me :)"
Well Haleigh today's your lucky day because The True Random Number Generator at Random.org. did pick you!!! Here's a screen shot:
Congratulations Haleigh!!!! We'll get you and Shannon in touch.
For those who didnt win, or who want more information, please visit Shannons SEO Guide Blog. Thank you again to Shannon for donating this amazing prize and for the fabulous interview!
Drum roll please.... and the winner is HALEIGH ROHNER!!!! In her winning comment Haleigh said: "Great feature! I've been wanting your guide forever! Pick me :)"
Well Haleigh today's your lucky day because The True Random Number Generator at Random.org. did pick you!!! Here's a screen shot:

Congratulations Haleigh!!!! We'll get you and Shannon in touch.
For those who didnt win, or who want more information, please visit Shannons SEO Guide Blog. Thank you again to Shannon for donating this amazing prize and for the fabulous interview!
Thursday, May 6, 2010
Jack of Hearts, TV Pilot

Last Saturday I had the pleasure of joining the cast and crew of Jack of Hearts for a photo session. (Side note, if you'd like to follow the journey of filming for this project, check it out here). Jack of Hearts is the brainchild of director Elyjah Wilbur who's wife Kate I met while doing work for the Sacramento Kings. I met up with Elyjah and Kate prior to the shoot to discuss the storyline and characters and get a feel for the show. Together, we talked about how to best capture the essence of the show and bring it out in the photo shoot. It was fun to learn the characters and creatively chew over with Elyjah and Kate the feel of the images, small details that we could include to elude to the character's nature and even the expressions and body language that would best emphasize this.
We also had to shoot with the final product in mind - so, for example, the image below (group images, bottom) with a lot of top and bottom room is intended as a possible poster for the show with room left top/bottom for title, info, etc. That's a key detail I learned while working with the Sacramento Kings who use a lot of the images we create at Media Day for their Gametime covers - for projects like this, its really important to know where the images are going and what they're intended for as it can direct how you shoot and compose.
Below are some fav images from the day and a few behind-the-scenes shots. And make sure to check out the fun video of the shoot here!
Image below - thought you guys would get a kick out of this. SO. I could have dressed a wee bit nicer for this project (and maybe styled my hair a bit! geez. ya don't know how bad it is until ya see yourself! LOL) Anyway! Talking in total girl-to-girl mode - the teeshirt I wore did my figure no favors. So, I did what any self-respecting photoshopping photographer would do - I helped myself out. :)Before (and no, I swear I'm not pregnant! it was just the wind and the shirt! :))
 Liquifying tool to the rescue!!! ohhhh baby! check out the flat tummy! :) If you're unfamiliar with the liquify tool, hit me up at my email and I'll send you some tips (studio@llfotos.com). Every women should know this tool - if only for her own vanity - inside and out!


possible posters


 some tech tips from this shoot:
Camera used: Canon 5d
Lens used: 85mm 2.8 (all group shots), 50 mm 1.4 (all individual shots)
Lighting: 2 Alien Bees. Most shots had a main 800AB with an octabox camera left in front of subjects at about a 45 degree angle and a 400AB bare bulb, camera left behind subjects. Individuals were shot using "flat lighting" - one 800AB octabox slightly above and behind my head. We used a white foam core board for fill for some of the group shots toward the end as light was dwindling.
Subscribe to:
Posts (Atom)
